
Prerequisites
There are some important installation process need to be carried out.
Note : – Content in Prerequisites are copied from – https://angular.io/docs/ts/latest/cookbook/visual-studio-2015.html
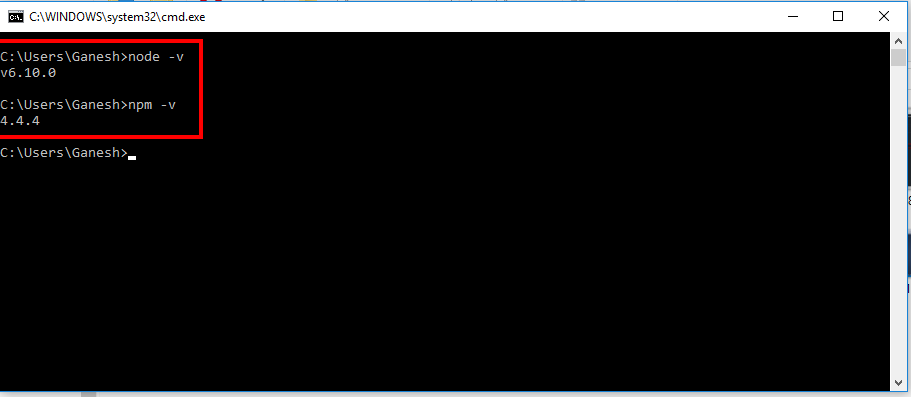
- Prerequisite: Install Node.js
Install Node.js® and npm if they are not already on your machine. Verify that you are running node version 4.6.x or greater, and npm 3.x.x or greater by running node -v and npm -v in a terminal/console window.
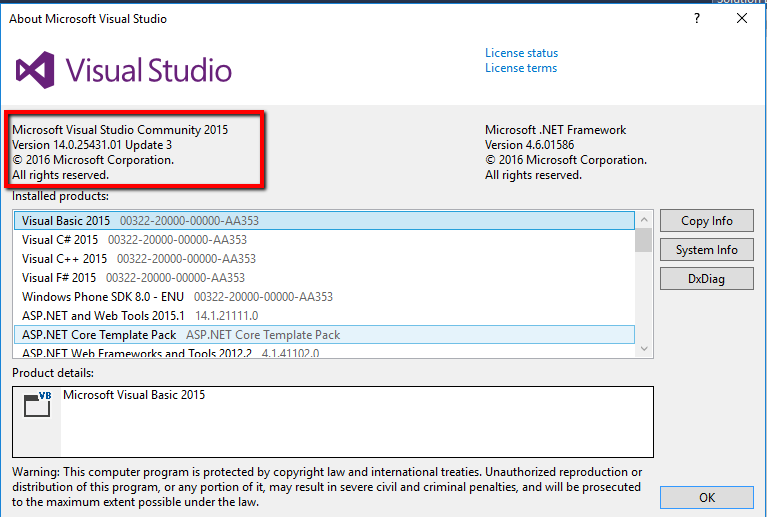
- Prerequisite: Install Visual Studio 2015 Update 3
- Prerequisite: Configure External Web tools
Configure Visual Studio to use the global external web tools instead of the tools that ship with Visual Studio:
- Open the Options dialog with
Tools|Options - In the tree on the left, select
Projects and Solutions|External Web Tools. - On the right, move the
$(PATH)entry above the$(DevEnvDir) entries. This tells Visual Studio to use the external tools (such as npm) found in the global path before using its own version of the external tools. - Click OK to close the dialog.
- Restart Visual Studio for this change to take effect.
Visual Studio will now look first for external tools in the current workspace and if not found then look in the global path and if it is not found there, Visual Studio will use its own versions of the tools.
- Prerequisite: Install Typescript 2 for Visual Studio 2015
While Visual Studio Update 3 ships with Typescript support out of the box, it currently doesn’t’t ship with Typescript 2, which you need to develop Angular applications.
To install Typescript 2:
- Download and install Typescript 2.0 for Visual Studio 2015
- OR install it with npm:
npm install -g [email protected].
You can find out more about Typescript 2 support in Visual studio here
At this point, Visual Studio is ready. It’s a good idea to close Visual Studio and restart it to make sure everything is clean.
Let’s begin
Note : Expecting basic knowledge of typescript.
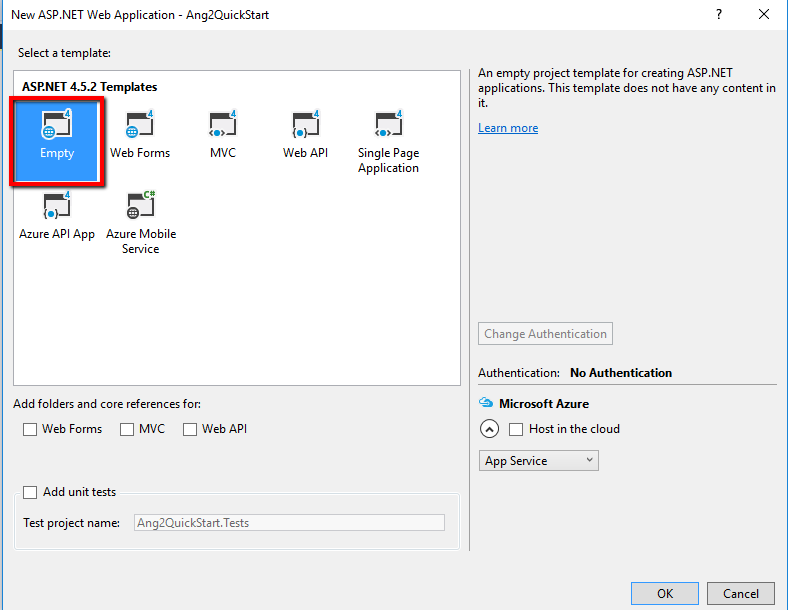
1. Create a new ASP.NET Empty Web Application Project in VS2015 => Also, make sure you uncheck the Application Insights check box.
2. Add a NPM configuration file => Right Click Solution => Add New Item => Npm Configuration File, i..e package.json file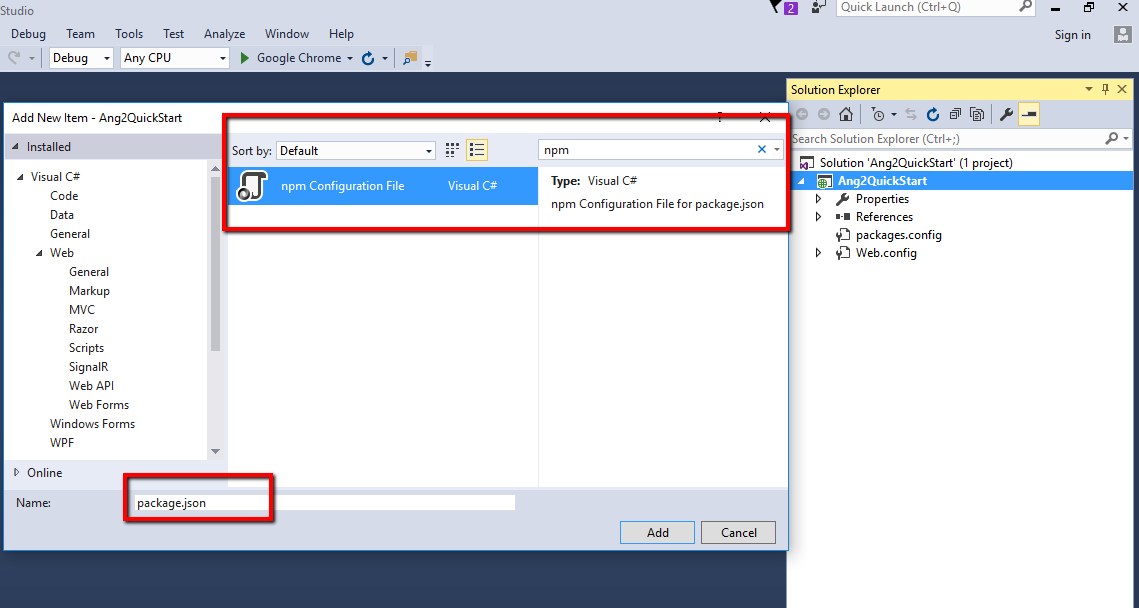
3. Copy paste following code in package.json and save it, as of now as a beginner, you will get clear picture after you familiar with npm structure and how it works and also here we will explain as much as possible in this post
{
  "name": "angular-quickstart",
  "version": "1.0.0",
  "description": "QuickStart package.json from the documentation, supplemented with testing support",
  "scripts": {
    "start": "tsc && concurrently \"tsc -w\" \"lite-server\" ",
    "e2e": "tsc && concurrently \"http-server -s\" \"protractor protractor.config.js\" --kill-others --success first",
    "lint": "tslint ./app/**/*.ts -t verbose",
    "lite": "lite-server",
    "pree2e": "webdriver-manager update",
    "test": "tsc && concurrently \"tsc -w\" \"karma start karma.conf.js\"",
    "test-once": "tsc && karma start karma.conf.js --single-run",
    "tsc": "tsc",
    "tsc:w": "tsc -w"
  },
  "keywords": [],
  "author": "",
  "license": "MIT",
  "dependencies": {
    "@angular/common": "~2.4.0",
    "@angular/compiler": "~2.4.0",
    "@angular/core": "~2.4.0",
    "@angular/forms": "~2.4.0",
    "@angular/http": "~2.4.0",
    "@angular/platform-browser": "~2.4.0",
    "@angular/platform-browser-dynamic": "~2.4.0",
    "@angular/router": "~3.4.0",
    "angular-in-memory-web-api": "~0.2.1",
    "systemjs": "0.19.40",
    "core-js": "^2.4.1",
    "reflect-metadata": "^0.1.8",
    "rxjs": "5.0.1",
    "zone.js": "^0.7.4"
  },
  "devDependencies": {
    "concurrently": "^3.1.0",
    "lite-server": "^2.2.2",
    "typescript": "~2.0.10",
    "canonical-path": "0.0.2",
    "http-server": "^0.9.0",
    "tslint": "^3.15.1",
    "lodash": "^4.16.4",
    "jasmine-core": "~2.4.1",
    "karma": "^1.3.0",
    "karma-chrome-launcher": "^2.0.0",
    "karma-cli": "^1.0.1",
    "karma-jasmine": "^1.0.2",
    "karma-jasmine-html-reporter": "^0.2.2",
    "protractor": "~4.0.13",
    "rimraf": "^2.5.4",
    "@types/node": "^6.0.46",
    "@types/jasmine": "^2.5.36",
    "@types/selenium-webdriver": "2.53.33"
  },
  "repository": {}
}
When you save this file visual studio automatically try to fetch important files through npm command as per configuration in package.json. you will notice at message bar at the bottom. and after few minutes it will say this message – “Installing package Complete”.
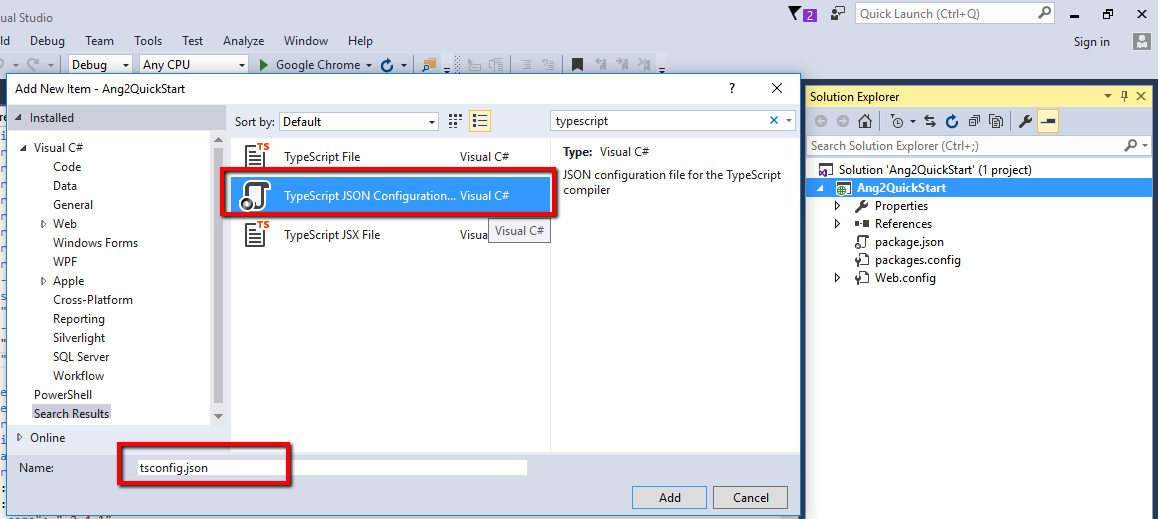
4. Add a Typescript JSON configuration file => Right Click Solution => Add New Item => Typescript JSON Configuration File, i..e tsconfig.json file and add following code in it and save it.
{
  "compilerOptions": {
    "target": "es5",
    "module": "commonjs",
    "moduleResolution": "node",
    "sourceMap": true,
    "emitDecoratorMetadata": true,
    "experimentalDecorators": true,
    "lib": [ "es2015", "dom" ],
    "noImplicitAny": true,
    "suppressImplicitAnyIndexErrors": true
  }
}
5. Now to go to project location in file explorer and delete node_module folder.
6. In Visual Studio Right Click on package.json file and hit “Restore Packages”
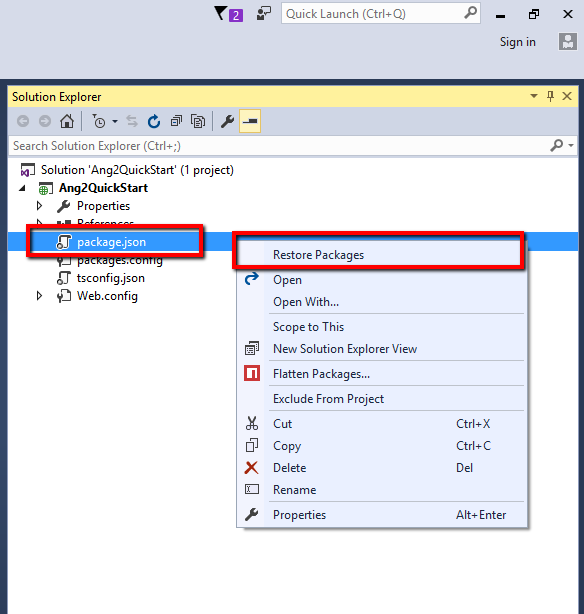
In step 5 we delete node_module folder because at the time of creation this folder they don’t have files regarding tsconfig.json file and in step 6 we recreate folder node_module which restore all files as per package.json configuration along with files as per tsconfig.json. Now we are ready to take our first step to implement angular application , till now we just configure project for Angular 2.
7. Add JavaScript file in under project with name systemjs.config.js, and add following code in it
/**
 * System configuration for Angular samples
 * Adjust as necessary for your application needs.
 */
(function (global) {
  System.config({
    paths: {
      // paths serve as alias
      'npm:': 'node_modules/'
    },
    // map tells the System loader where to look for things
    map: {
      // our app is within the app folder
      app: 'app',

      // angular bundles
      '@angular/core': 'npm:@angular/core/bundles/core.umd.js',
      '@angular/common': 'npm:@angular/common/bundles/common.umd.js',
      '@angular/compiler': 'npm:@angular/compiler/bundles/compiler.umd.js',
      '@angular/platform-browser': 'npm:@angular/platform-browser/bundles/platform-browser.umd.js',
      '@angular/platform-browser-dynamic': 'npm:@angular/platform-browser-dynamic/bundles/platform-browser-dynamic.umd.js',
      '@angular/http': 'npm:@angular/http/bundles/http.umd.js',
      '@angular/router': 'npm:@angular/router/bundles/router.umd.js',
      '@angular/forms': 'npm:@angular/forms/bundles/forms.umd.js',

      // other libraries
      'rxjs':                      'npm:rxjs',
      'angular-in-memory-web-api': 'npm:angular-in-memory-web-api/bundles/in-memory-web-api.umd.js'
    },
    // packages tells the System loader how to load when no filename and/or no extension
    packages: {
      app: {
        main: './main.js',
        defaultExtension: 'js'
      },
      rxjs: {
        defaultExtension: 'js'
      }
    }
  });
})(this);
It is also a configuration file. Please notice comments in the code, two important things are
i. where our code resides i.e folder name, here i mention “app” at line number 14
ii. and which is our starting file run Angular 2 application, here i mention “main.js” at line number 33
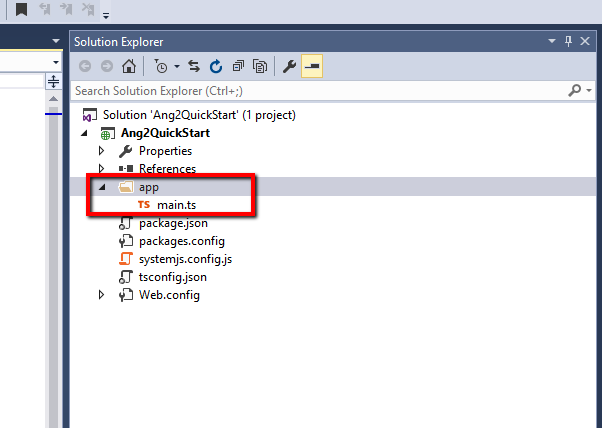
8. As we configure in last step, add folder with name “app” and add “main.ts” i.e. typescript file in it.
Typescript is a strict superset of JavaScript i.e. code will convert into JavaScript. And Angular 2 comes with Typescript compulsory. That means our main.ts file will convert into main.js file as we mention in systemjs.config.js file.
9. Add following code into main.ts file
import { platformBrowserDynamic } from "@angular/platform-browser-dynamic"

import { AppModule } from "./app.module"

platformBrowserDynamic().bootstrapModule(AppModule);
please notice code, here we are creating our module, here named it as “AppModule”.
platformBrowserDynamic – is nothing but a class export from @angular/platform-browser-dynamic file
we bootstrap our module into Angular 2 by passing Module to bootstrapModule function at line number 3.
10. In last step we just define our module, so create/declare our module in another file named as “app.module.ts” in app folder and add following code in it.
import { NgModule } from "@angular/core"
import { BrowserModule } from "@angular/platform-browser"
import { FormsModule } from '@angular/forms';
import { AppComponent } from "./app.component"

@NgModule({
    imports: [BrowserModule, FormsModule],
    declarations: [AppComponent],
    bootstrap: [AppComponent]
})

export class AppModule { }
in this file we are declaring our AppModule with syntactical manner of Angular 2. Please notice line number 4 , we are exposing our AppModule using AppComponent which is also a class, which is nothing a declaration of UI design into it.
11. As mention in step 10, we have to create/declare AppComponent. So add typescript file named as “app.component.ts” and add following code into it.
import { Component } from '@angular/core';

import { Customer } from "./Customer"

@Component({
    selector: 'my-app',
    moduleId: module.id,
    templateUrl: './st.html'
})
export class AppComponent {
    customerobj: Customer = new Customer();
}
in this file we have mention that , when found my-app attribute in html then render st.html file there and st.html expecting model so we are passing that model from AppComponent class. Here tried to pass Customer Model with object name customerobj. (For two way binding)
12. Add Customer Model in new typescript file with name Customer.tsin app folder and add following code into it.
export class Customer {

    public CustomerName: string = "asdsad";
    public Code: string = "asdsa";
    public Amount: string = "asdasd";

}
And add ts.html file in app folder as we mention add following code into it.
<div>
    Customer Name :- <input [(ngModel)]="customerobj.CustomerName"  /> <br />
    Customer Code :- <input [(ngModel)]="customerobj.Code"  /><br />
    Amount :- <input [(ngModel)]="customerobj.Amount"  /><br />
    <br />
    <br />
    <br />
    {{customerobj.CustomerName}} <br />
    {{customerobj.Code}} <br />
    {{customerobj.Amount}}
</div>
13. Add one HTML page make it as startup page and add following code into it.
<!DOCTYPE html>
<html>
<head>
    <title></title>
    <meta charset="utf-8" />
    <script src="https://cdn.polyfill.io/v2/polyfill.min.js?features=Intl.~locale.en"></script>
    <script src="node_modules/core-js/client/shim.min.js"></script>
    <script src="node_modules/zone.js/dist/zone.js"></script>
    <script src="node_modules/reflect-metadata/Reflect.js"></script>
    <script src="node_modules/systemjs/dist/system.src.js"></script>
    <script src="systemjs.config.js"></script>
    <script>
      System.import('app').catch(function(err){ console.error(err); });
    </script>
</head>
<body>
    <my-app>Loading...</my-app>
</body>
</html>
This is our first landing page, we just declare required file and starting point in Head section, and add
<my-aap> tag into body section.
Save and Run application. That’s all. Hope this helps!! This is for the beginners who like to learn Angular 2.
(This article, along with any associated source code and files, is licensed under The Code Project Open License (CPOL))