Step 1
The goal of this step is to have a single page web application (SPA). If any tools or packages required are missing, you might need to add them to your Visual Studio Edition before the end of this step. At the end of this step, you can exceute or debug the project to show a web page in your browser without any content in it.
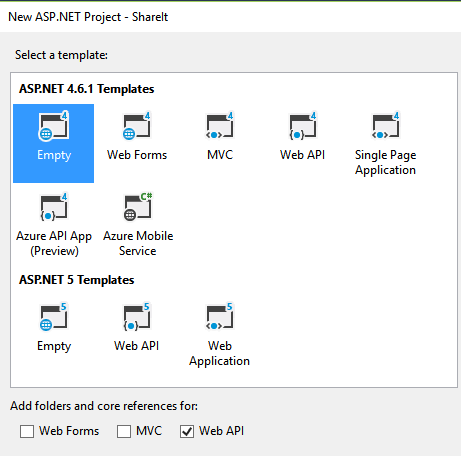
Open Visual Studio and start a new ASP.Net Web Application project. You may name the project of your choice. As you can see, I am using .Net Framework 4.6.1. There is not much of a hard dependency on the version as it might work for lower versions. I haven’t tested that though.

I am selecting an empty template with support for WebApi. This project uses MVC framework only for namesake and I will show you, how Visual Studio automatically add suport for MVC later during development.
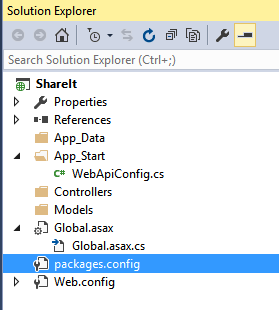
Now we are done with the project creation and the below picture shows the resulting folder structure of the project.
Next I am adding a local SQLServer Database to the project. Right click on the project in the solution explorer and navigate through the menu to add a new item. Select Data on the installed templates on the left side and choose SQLServer Database. Give a name of your choice. Click “Add” button to add the database.

The wizard will ask the location of the database file and accept App_Data as the location since it provides ASP.Net default security for the folder.

The Database created above is not used until Step 3. The reason for including it here is to have a basic Web Application ready by the end of this step.
Next is to add an MVC empty controller. Keep in mind that we did not add any support for MVC while creating the project. So during this controller addition, Visual Studio must add the necessary folders, references, and files to the project. The controller only works as a means of opening the default view and don’t include any read/write actions or using the Entity Framework to do any database operations.

The controller is named as LoginController. The name is important and if you name it anything else, the RouteConfig file need to be edited accordingly below.

You can click “Add” and unless there are no issues with the Visual Studio setup, you should get the controller added. There could be scenarios where you may get some error related to MVC framework support addition.
(In that error scenario, it will be possible to circumvent the visual studio process and manually add the folders, edit the web.config file inside the view folder and create and add the view before adding the controller. If any such thing happens, you may add some comments, and I can provide alternate steps to overcome the problems. Another step is to start from scratch again and create a brand new project and repeat the steps.)
Once the MVC controller is added, you can see the resulting folder structure as below. There are some files and folders not required for the AngularJS,Typescript and RequireJS template and we can remove them in the next substeps.
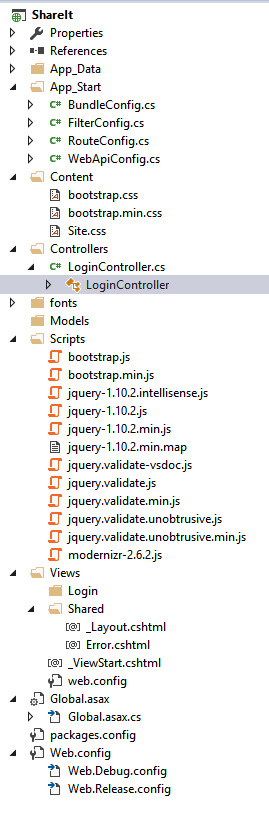
The “Shared” folder, the layout and error html files are not needed since this is a SPA (single page application).
Some of the javascript files inside Scripts folder are also not required and they can be removed later when you deal with the Nuget package manager.
When the controller is added, a readme file is opened in the source editor window. The steps in that file are followed to get default routing is working for both MVC and WebApi. The WebApi config registration must be before the MVC routing support is added.

Here is the resulting code content of the Global.asax.cs file.
using System.Web.Mvc;
using System.Web.Routing;
using System.Web.Http;

namespace ShareIt
{
    public class WebApiApplication : System.Web.HttpApplication
    {
        protected void Application_Start()
        {
            AreaRegistration.RegisterAllAreas();
            GlobalConfiguration.Configure(WebApiConfig.Register);
            RouteConfig.RegisterRoutes(RouteTable.Routes);
            FilterConfig.RegisterGlobalFilters(GlobalFilters.Filters);
        }
    }
}
Right click on the “Shared” folder and select the “Delete” menu item.

We don’t need to bundle any javascript or css files as we are dependent on RequireJS to load the modules we needed and also use Typescripts importing of modules as and when required. We also use AngularJS directives in the last step to pull some html templates which is provided free as part of the AngularJS-UI-Bootstrap package. If you want to see the downloading of the files in action use the Development tools by clicking F12 and see them while the pages are loading.
Next delete the BundleConfig.cs file from the “App_Start” folder.

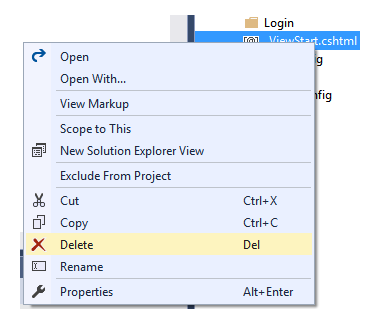
Delete the ViewStart.cshtml next.
The RouteConfig.cs file is edited to have the default controller set. If you don’t set this, the application won’t be able to route the traffic to the correct controller and may end up in an error page.

Here is the code in the RouteConfig.cs file after it is edited.
namespace ShareIt
{
    public class RouteConfig
    {
        public static void RegisterRoutes(RouteCollection routes)
        {
            routes.IgnoreRoute("{resource}.axd/{*pathInfo}");

            routes.MapRoute(
                name: "Default",
                url: "{controller}/{action}/{id}",
                defaults: new { controller = "Login", action = "Index", id = UrlParameter.Optional }
            );
        }
    }
}
If you get any code warnings, add the “using” using the intellisense.
Right click on the “Login” folder and add an HTML page. Name the page as Index.cshtml. Since this is an MVC project, the extension expected is cshtml, but the content of this file will not have any Razor syntax in it.

We modify the content of the head as follows. The body will be added in Step 2 of this article.

<!DOCTYPE html>
<html>
<head>
    <meta charset=utf-8 />
    <meta http-equiv=X-UA-Compatible content="IE=edge">
    <meta name=viewport content="width=device-width, initial-scale=1">
    <link rel="Shortcut Icon" type="image/ico" href="~/Content/image/favicon.ico">
    <title>Share It</title>
    <link href="~/Content/bootstrap.css" rel="stylesheet" />
    <link href="~/Content/Site.css" rel="stylesheet" />
</head>
<body>

</body>
</html>
Step 2
This step starts with adding the required Nuget packages for Angular, RequireJS, DefintelyTyped for Angular, Typescript support and bootstrap.
Right click on the project in Solution Explorer and open the Nuget Package Manager window. We need to search for the packages and for making it easier, do not open the console and install using the command prompt. If you know the package names and versions in advance, you are free to follow that path. I will post the content of the packges.config later at the end of this step so that advanced users may use the console instead.
Select the “Browse” tab and type requirejs. Install RequireJS v2.1.22 as shown.

Next we are installing the Typescript definitions for RequireJS. A typescript project looks for definitions as classes and not as traditional javascript functions. The type-definition files provide these definitions. Download and install requirejs.TypeScript.DefinitelyTyped package v0.2.9 now.

Once the package is installed, a new dialog will come up asking for adding the support for typescript in your project. You need to answer “Yes” for this dialog so that all typescript typings for all the javascript libraries included are installed by the package manager.

Next add the AngularJS core package. We don’t need to add all of the AngularJS modules but only selective ones like core, routing and sanitize which is enough for this project.

Next download and install the routing module.

Download and install Sanitize which is required as part of some advance Angular support later in the steps.

It is time to add the typescript definitions for the angular packages now.

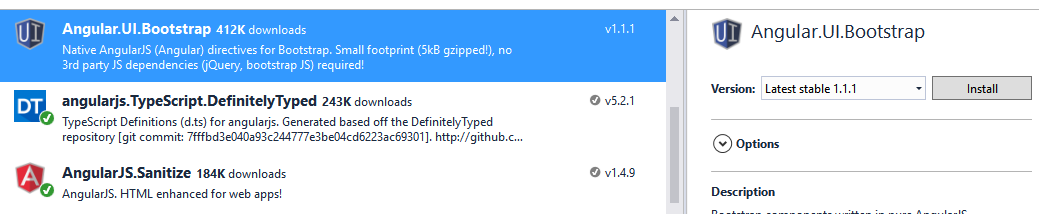
We are adding some AngularUI components like Accordian and Collapse later in the last step. Add the AngularUI Bootstrap package.
Next two are very important parts and without it, the project will not build and I could see a lot of searches in Google for how to solve these build errors. The errors are because of the version that is installed as default and the update is a must. Type jquery in the browse tab of Nuget package manager and install the typescript definitely typed for jquery. Angular uses these jquery definitions.

Update the installed jquery version to the stable 2.2.0.

As promised in the beginning of this step, the package.config file image is as below. Some of the existing packages like modernizer are removed.

It is time to add some typescript code to the project.
Right click on the “Scripts” folder in Solution Explorer and add a new folder named “appScripts” now. All the typescript code for the angular controllers, services and routing will reside here. I could have added separate folders for controllers and other artifacts but as I said in the beginning of this article, what we need is just a prototype and folder structure is not a goal.

Right click on “Scripts” folder and add a new typescript file as shown below. Let the name of the file be main.ts.

Drag and drop “angular.d.ts” and “angular-route.d.ts” from inside the typings/angularjs folder to the main.ts file opened in the source editor as below.

Add a new typescript file “mainControllers.ts” inside “appScripts” folder. This is to define the collection of controllers that will be used in the application. In this step there will be only a single controller called MainController and its responsibility is trivial like adding a couple of variables to the $scope. (The code is formatted as javascript since no typescript formatting is available.)
This typescript file exports a class called mainControllers to any other typescript file which can import this class and instantiate it to create a new object of its type and invoke publicly exposed methods in it. Inside the constructor of this class, a new angular module named “mainControllers” is created. This module has a single controller “MainController” which will be used to inject the scope and populate the scopes variables to be used in the view.
Add the content of the file as follows.
"use strict";

export class mainControllers {
    constructor() {
        var app = angular.module("mainControllers", []);

        app.controller('MainController', ($scope, $location) => {
            $scope.name = "John";
            $scope.lastName = "Doe";
        });
    }
}
Add a new typescript file “shareApp.ts” inside “appScripts” folder. Copy the content of the file as below.
"use strict";
import mainCtrlsModule = require("mainControllers");

export class shareApp {
    constructor() {
        var ngApp = angular.module('shareApp', ["ngRoute", "ngSanitize", "ui.bootstrap", "mainControllers"]);
        var mainCtrls = new mainCtrlsModule.mainControllers();
    }
}
As mentioned before we use RequireJS to specify the module and call it “mainCtrlsModule”. We instantiate the mainControllers class from it. The application module that we are using is “shareApp” and we are injecting “ngRoute”, “ngSanitize”, “ui.bootstrap” and “mainControllers” to the ngApp module we created. The picture gets more clear when we modify the main.ts to include more code in it. Here is the code to be added to the main.ts file.
requirejs.config({
    baseUrl: "Scripts/appScripts",
    paths: {
        "jquery": "../jquery-2.2.0.min",
        "bootstrap": "../bootstrap",
        "app": "./shareApp",
        "angular": "../angular",
        "ngRoute": "../angular-route",
        "ngSanitize": "../angular-sanitize",
        "mainCtrls": "./mainControllers",
        "ui.bootstrap": "../angular-ui/ui-bootstrap-tpls"
    },
    shim: {
        "ngRoute": ['angular']
        "ngSanitize": ['angular'],
        "ui.bootstrap": ['angular'],
        "bootstrap": ['jquery']
    }
});

requirejs(["app", "bootstrap", "angular", "ngRoute", "ngSanitize", "ui.bootstrap"], (app) => {
    var shareApp = new app.shareApp();

    angular.element(document).ready(() => {
        angular.bootstrap(document, ['shareApp']);
    });
});
The content added now to the main.ts file does the RequireJS module definition and dependancy management.
In the config call, the base folder where the code for the application resides is specified. The paths below lists all the code paths and they are relative to the baseUrl folder specified. The shim is used to mention about the dependencies of each module. For example, bootstrap is dependent on jquery. In the main page, when responsive layout is used and when the menus are collapsed, a click will expand it only when bootstrap javascript code calls the jquery code. Similarly the angular-route module is dependant on angular module.
We are creating the main requirejs object by passing the app module as argument and creating an instance of shareApp class. We don’t specify ng-app in the html file. This is because, the routing will not be loaded correctly by the time the document is ready. So we do a manual bootstrap of angular only when the HTML document is ready.
In this step there is no routing involved and we might use ng-app angular directive but for preparing for Step 3, the manual bootstrap is included here.
Next part is the modification of the index.cshtml file.
Before the end of the head section, we add the following
<script data-main="/Scripts/main" src="~/Scripts/require.js"></script>
This is like adding a normal javascript file reference to any html file. The data-main is the important part here. What it is saying is the RequireJS should look inside a file called main.js in “Scripts” folder to get more information about the configuration and the initialization. Even though we added “main.ts” which is a typescript file, the typescript compiler converts it to javascript file.
We will now add some menu items and default angular bindings for the trivial scope variables added. The resulting index.cshtml file will be like below.
<!DOCTYPE html>
<html>
<head>
    <meta charset=utf-8 />
    <meta http-equiv=X-UA-Compatible content="IE=edge">
    <meta name=viewport content="width=device-width, initial-scale=1">
    <title>Share It</title>
    <link href="~/Content/bootstrap.css" rel="stylesheet" />
    <link href="~/Content/Site.css" rel="stylesheet" />
    <script data-main="/Scripts/main" src="~/Scripts/require.js"></script>
</head>
<body  ng-controller="MainController as ctrl">
    <div class="navbar navbar-inverse navbar-fixed-top center">
        <div class="navbar-inner">
            <div class="container center">
                <div class="navbar-header">
                    <button type="button" class="navbar-toggle collapsed" data-toggle="collapse" data-target="#navbar" aria-expanded="false" aria-controls="navbar">
                        <span class="sr-only">Toggle navigation</span>
                        <span class="icon-bar"></span>
                        <span class="icon-bar"></span>
                        <span class="icon-bar"></span>
                    </button>
                    <a class="navbar-brand" href="/">
                        <span class="color-white">Share It</span>
                    </a>
                </div>
                <div id="navbar" class="collapse navbar-collapse">
                    <ul class="nav navbar-nav">
                        <li><a href="/">Login</a></li>
                        <li><a href="/Register">Register</a></li>
                        <li ng-class="{disablea:!ctrl.loggedIn}"><a href="/Buddies" ng-class="{disablea:!ctrl.loggedIn}">Add Buddies</a></li>
                        <li ng-class="{disablea:!ctrl.loggedIn}"><a href="/Share" ng-class="{disablea:!ctrl.loggedIn}">Share</a></li>
                    </ul>
                </div>
            </div>
        </div>
    </div>
    <div id="container" class="container leftrightjustify">
        <p>Name : {{name}}</p>
        <p>LastName : {{lastName}}</p>
    </div>
</body>
</html>
There is a final step before building the project. Right click on the project and open properties.
Go to TypeScript Build property page and select the ECMAScript version as ECMAScript 5. Also specify the module system as AMD. This will enable the export of typescript classes and import of them.

Any build before enabling the module system might end up in build failures. So build the project only after modifying the Typescript Build properties.
Execute or debug to see the page below.

(This article, along with any associated source code and files, is licensed under The Code Project Open License (CPOL))
Some Useful Tips:
Tip for migrating an Angular 1 application to Angular 2?
There was such an interest in the community developing in Angular 2 before it was actually released, which was a good and bad thing. The result of this was a slew of documentation and blog posts created around earlier builds of Angular 2, with tutorials and tips on migrating Angular 1 apps to Angular 2. However as the framework evolved and got closer to being released, the API changed in A2, thus rendering a lot of the information invalid and, frankly, misleading.
The best documentation for the current migration process can always be found at Angular’s site (angular.io), and is inclusive of strategies like migrating to TypeScript, using component directives, project restructuring and finally integrating the upgrade module to make a hybrid A1/A2 applications.
What is the number one thing NOT to do when migrating an Angular 1 application to Angular 2?
Having a mindset that all of your existing Angular 1 application must be migrated to Angular 2 in one fell swoop is not a requirement. The Upgrade Module available in Angular 2 makes it possible to begin introducing Angular 2 components and using them in your hybrid bootstrapped application by downgrading them as A1 directives. You can then continue to convert A1 code to A2 code over time and ultimately ending up with a completely A2 (or Angular version.next) application. This process allows a slower and methodical migration, so that the pain of refactoring doesn’t have to be done all at one time.